Showing posts with label "Tuesday Tutorials". Show all posts

Tuesday, March 22, 2011

Tuesday Tutorials: 100th Post!!! Whoopie!

It's my 100th post! So excited! I wanted to share with you an idea that works great for party favors or a fun birthday gift and is quick and easy to do! I always like to have hard candies on hand for sucking on if need be and was trying to find a place to put mine and it dawned on me that I had this empty plastic Starbucks cup sitting on my window ledge and I thought, maybe I can use that. While out shopping on Saturday I wandered into a candy shoppe and lo and behold the idea I had had already been taken so I just had to buy one of these gorgeous cups!

Here they are for you to see:
The one on the left is from Bruttles Gourmet Candies and Treats & the one
on the far right is my Starbucks cup I decided to reuse. The tray is also from
Starbucks.

Taffy in the Bruttles cup and Jolly Ranchers in the Starbucks one.
So, this project is a reuse/recycle one. I took my Starbucks cup and washed it well with dish soap (the straw too), rinsed it and dried it completely. Once it was clean I just filled it with the candies as shown and voila! Instant gift or party favor! The tray was from my brother's last trip to Starbucks and I snatched it up thinking I might be able to use it. I think if you have some or even save a few they would make a great way of displaying party favors and people can take them off the trays as they leave and you will have them to use again for another function. So, it's quick, easy and affordable! Hope to see you all create some with your favorite candies!

Cheers!

Wednesday, October 6, 2010

Tuesday Tutorials on a Wednesday....


I had a very busy day yesterday and was not able to get a tutorial going but better late than never I say! Since I am not the only one who does 'Tuesday Tutorials' I thought it would be fun to google the term and see what comes up. Here are the top three:


  1. Indie Fixx by Jen Wallace- I really love the layout and her posts! This 'Tuesday Tutorial' about printables is just adorable: http://indiefixx.com/category/tuesday-tutorial/
  2. Melly & Me: Fun Fabulous Design by Rosalie Quinlan and Melanie Hurlston- These sisters have a 'Tips & Tricks: Tuesday Tutorial' series that has some excellent tips of all kinds! Great sewing trips, beautiful design!
  3. Ali Edwards has some great scrapbooking tutorials for their 'Tuesday Tutorial' series and they are very informative. 
I really enjoy seeing what others are doing and with Christmas not far off getting ideas and sharing them is a plus! Here are a few of my Christmas tutorial favorites from around the web:

Button Wreath Tutorial by One Crafty Mumma...

cinnamon scented sachets by homemade by jill...

Paper Christmas wreath from the red thread Christmas Tutorials...

I can't wait to share my own tutorials for Christmas with you guys soon! It's going to be awesome! Have a great Wednesday!

Cheers!


***Note***: Crafting photo from Hoopla Now.


Tuesday, September 28, 2010

Tuesday Tutorials: Making a hand-made fall themed postcard...

I adore autumn! It's my favorite season. So when I heard about the fall themed postcard swap I was all over it! The task was to create a handmade postcard with an autumn theme and I thought I would share how I made mine with you. So here we go!

You will need the following:


  • Mat stack of your choice (I used the 'Once Upon a Time' mat stack from Die Cuts with a View)
  • Brown Crayola Marker, basic colors collection
  • Autumn Leaf stickers (for texture and relief)
  • Autumn themed stickers
For some card making inspiration I used the following magazine:


Card Maker magazine...

And here are the steps:


  1. Make a rough sketch of how you want your postcard to look, I drew it in my notebook.
  2. Choose your card stock mat according to your theme, I really liked the light backdrop this particular mat created for the embellishments I used.
  3. Choose your stickers according to the theme you've decided to use (I used these photo stickers my father had given me as a gift).
  4. Begin placing your leaf accent stickers where you have sketched them on your mat.


     5.  Choose something to write, a message according to your theme (I used a simple message from the 
          Card Maker magazine).
     6.  Place embellishment stickers on mat according to your layout.
     7.  Continue to embellish postcard and write message you chose to use on there as well using a brown
          Marker or another autumnal color.
     8.  Finish placing embellishments and write personal message on the opposite side of your postcard.

And here you have the finished product:


Enjoy! Cheers!


***Note***: In my second steps collage a few photos were labeled incorrectly, sorry for the inconvenience but you get the general idea! 

Tuesday, June 8, 2010

Tuesday Tutorials: Make it your own!

I can't believe it is already June! Yikes! Where has time gone? For me it has been a whirlwind ride of teaching and going to cultural events lately! I've been so busy that when I get home I am too tired or too spent to even think about writing a post but here I am back again from the woodwork!
I've been working on making this room here my own (not an easy task since there are so many useless things lying around here that I am trying to figure out what to do with) and have commenced by decorating one side of the shelf for me to enjoy and look at!

If you read my post in April about collage making, then you will recognize the first piece on my shelf-side collage. I used that collage as a starting point for this particular decoration piece:


What else did I use, you ask? Well, I have an ever growing collection of postcards and trinkets people send me so I started to use them as the basis for my collage. Among the ones pictured are a postcard from Socks for Happy People, a postcard my parents brought me from Lima, Peru, and a few little cards from Paris my friend Martina sent me! I am a very visual person and having a bland room is not my idea of fun!

In order to not harm the shelf nor harm the pieces I am using I decided to use mounting tape to get them up there. It peels off fairly easily when I want to change something around and is less annoying than regular scotch tape.


Thank God for creativity and ingenuity! It's the little things in life that inspire me most! Have a bright and cheerful day! What decorating plans do you have for this summer? I'd love to know!

Cheers!

Tuesday, May 18, 2010

Tuesday Tutorials: Food-torial! Peanut Butter, Banana and Honey Sandwich

I love peanut butter and bananas! So today I wanted to share with you a tutorial about making some really yummy and peanuty snacks. Here is the list of ingredients in pictorial form:

Wheat + Oatmeal Bread


One banana...

The goodness of Extra Crunchy Peanut Butter....
and honey...lots of honey...

This bread is one of the best healthy breads in all of Caracas... I love it!

So, on to the assembly:


Spread some peanut butter goodness on both slices of bread (this is an open faced sandwich).


After spreading all that good peanut butter, slice the banana and place it directly on top of the covered slices of delicious bread...oh, la, la! Finally, drizzle some amazing fresh honey over the bananas, letting it drip onto the peanut butter and voila! The finished product is below in all it's glory!

Bon apetit!

Tuesday, April 27, 2010

Tuesday Tutorial: Creating a collage out of what you've got...

I love collages and each one I make is always different. For this one I decided to do a little painting, a little cutting, a little pasting with some whimsy on the side! First, the supplies:


I used two different colored paints, one pink and one purple for the background painting, the back photos of CD cases (I got a CD notebook and got rid of all the plastic cases), a piece of yellow cardstock, some pens, markers and a glue stick.

First I painted the entire background pink:

Afterward I let it dry and caught up on a few blog posts by personal friends from college. It was great to be able to check out their blogs. Once that was dry I painted the trees and drew the flowers:


Once that was all taken care of I pasted down the photos I'd decided to use plus a print out of the Irish Blessing I had lying around. It was fitting because the band photo I chose was of U2, my favorite Irish band.


With a little bit of imagination and creativity you can turn anything into a work of art using that which you find just "lying around." I think I will frame this little ditty! Oh, and of course, chocolate must never fail to be around for crafting pleasure:


YUM!!! I love milk chocolate! Enjoy the craft and share your own!

Cheers!

Tuesday, April 20, 2010

Tuesday Tutorials: Gathering Inspiration

As a crafter I often look for inspiration in various places and forms. Sometimes it comes from what I am eating, sometimes it comes from a picture, sometimes the color of a certain article of clothing and other times it comes from what I am reading. As I have mentioned before, I read many blogs and lately they have been a great source of inspiration but, more often than not, it is the magazines that I read which provide me with the most inspiration. One of my latest acquisitions, Marie Claire Idees, has given me a great new French inspiration for crafting and even decorating. I purchased a copy from January of this year at a bookstore here in Caracas called Las Novedades.

At Las Novedades I have always found interesting magazines ranging from decorating to crafting to cuisine, all very good and slightly different from the magazines we get in the US. I like to have a mixture of things from different parts of the world so it is nice to be able to get magazines from France, Italy, Spain, Colombia, Mexico, England, Germany and even the US. Another magazine which greatly inspires me is ReadyMade which has a great many DIY projects and tips for the creative person to enjoy. I have two copies from last year and really wish I could get a subscription to the magazine, I am working on figuring that out. In the meantime I check out Ready Made's webpage for the latest projects and news.

Beyond Ready Made and Marie Claire Idees, my other source of inspiration comes from within my e-mails. Nothing like the daily dose of inspiration I receive from Martha Stewart. One of my favorites from last week was the Organizing Tip of the Day: Bookcase Armoire. I've been looking for some room decor inspiration and lo and behold I found that link in my e-mail! I just love the look and feel of the armoire and the fact that it is in itself a craft makes it all the more fun and intriguing! The armoire calls my attention because it is such a space saver and the room I am going to be living in for the next few years is such that while it is somewhat spacious it would work better to have something similar to be able to better organize my things.

So, now you see more or less where I get my crating and decorating inspiration, where do you get yours?

Cheers!

Tuesday, April 13, 2010

Tuesday Tutorials: Decorating a notebook with gum wrappers...

That's right! Tuesday Tutorials are back in action! Late but nevertheless here. Anyone who knows me well knows that I have a chewing gum addiction that I just can't seem to kick! Everytime I chewed a new piece of gum I wondered what I could do with the wrappers and started saving them to see what I could come up with...the gum wrapper decorated notebook was born!

I took the following materials and embellishments to create my recycled work of art:

All the materials...
  • Composition Notebook
  • Various sticker packs
  • Paris Rubber Stamps
  • Stamp pads
  • Gum Wrappers (kept inside 5 Gum box)
  • Contact Paper
Using a normal glue stick I began to glue the colorful gum wrappers down in a pattern, like so:

The notebook, front cover


The notebook, back cover...

See how pretty it looks already? After having covered both sides with the gum wrappers I embellished another type of gum wrapper with a Paris Eiffel Tower stamp I have using the black ink stamp pad. The paper is patterned from Orbit gum. The rest of the embellishments are stickers but you can use cut outs, print outs and any thing else you can get your hands on. Get creative and go your own way! The main thing about this project is that you are reusing wrappers so they don't go to the landfill!

Paris stamp on patterned gum wrapper paper...

Finished front cover....

Back cover shot...

Once you'ved finished emellishing the notebook as much as you want you can go ahead and cover it in contact paper so that the embellishments and gum wrappers remain neatly on and don't start to peel off. If you decide to make this project I would love to see what you come up with! Please link back to this post and let me know what you have made or place photos of your own creations on the wall on our Facebook page.

Tuesday, April 6, 2010

Things to do....

How I wish I could be crafting all the day long but I've not had the chance to do that at all! I've been mostly helping do things around the house, photo editing, updating flickr, and trying to keep from getting bitten by the tons of mosquitos that keep attacking me all day and night long! They seem to get feisty when it is hot here and then they get worse after it has rained and is still hot out (I guess it's a tropical effect or something). So, things are just a bit hectic and tiring but hopefully all will be normal after a while.

On Sunday, after church, I ran all over La Candelaria looking for a birthday gift for my friend and finally found a few things I thought she might like in Ferka. Thankfully we've had rain the last couple of days but my main concern is that it rain in the parts of the country where it is most needed, with this drought the rivers are not filling up and it is bad for us because Venezuela runs mostly on hydroelectric power. Conserving energy has never been more difficult. Anyway, my friend's birthday was a ton of fun and the fabulous cake our other friend made for her birthday got many oohs and ahhs, you can check the photos out on her facebook page: Marianna's Cakes. Here's on of the photos I took:


I hope to be able to keep you more updated throughout the week. I seem to be busy all the time here and I am not even working yet! LOL!

Cheers!

Tuesday, March 9, 2010

Let's Connect...

I am not sure what title to give to today's entry, being that it is rather late in coming and I have not even really figured out what I will share this evening, it is more likely that I shall have a title by the end of the post rather than at the beginning. It's Tuesday and normally I would bring you some kind of tutorial but sometimes it is good to break from routine and write something more heartfelt.

Perhaps it is the music I am listening to (Love is Free by 101 Strings Orchestra Sampler) or the fact that I finally watched Julie & Julia in it's entirety but I'm a bit nostalgic this evening. I've had a lot on my mind these days. I am a firm believer in that thinking too much is dangerous so tonight I just want to talk, to share with you in the hopes that you too will share something with me. The movie was great! I think it was just lovely. It made me want to cook French food, drink Bordeaux and eat chocolate! It also reminded me that I really ought to continue my français lessons on livemocha.

I bought a little composition notebook at the Dollar Tree which I plan on decorating and keeping as a French book. I had started one before leaving Florida but it too is packed away in a storage unit in New Jersey, wondering when it will come out of the dark and back into the light. I am extremely used to moving and every time I move into a new place and open my boxes it's like Christmas. I know it may sound weird but I enjoy moving...it is how I have come to know so many wonderful places and wonderful people. I am in transition at present and God only knows where I will end up but I do so much hope to one day live a year in France, another in Italy and maybe even in India some day!

I miss my friends as well but I thank God for the internet! I relish letters but can reconcile myself to receiving e-mails or wall posts on facebook. I am nearly thirty but feel fifteen and somehow I think this will not change anytime soon. I was recently looking through photos I'd taken a about 3-5 years ago while living in Cheney, WA and found a few of my earliest crafts which I love! I have this composition notebook turned into cookbook project that I've been working on for several years now and it is one of my favorite things in the world. Here is a page from it:
Tea cookie recipe from a magazine...

This notebook is like a scrapbook of recipes from magazines, old recipe cards my mom had in a little box, school recipe papers from home-ec class and the like. That is what I love about it. It's very personal and unique. Another photo I found is one I took of a notebook I had decorated with my friend Melissa Mason. I'd been inspired by a scrapbooking magazine to decorate a journal and thought it would be something fun for both she and I to do together and I hope she still has hers. Here is mine:

Melissa and I being silly, as was our custom...

There was never a boring moment when hanging out with Melissa! I miss her and all of my friends in Spokane very much. Still, I would not trade the time I get to spend with my nieces right now for anything else in this world. They are adorable and I love being with them. Lord, I feel like I am confessing tonight! Anyway, I think this next photo is something worth getting a good laugh at. My sad attempt at making a guitar cake as per Betty Crocker:

Melissa loved her cake and it is the thought that counts...

I think that rather strange looking blob next to the cake was supposed to be a guitar pick fashioned from one of the left-over cut-outs of the assembling of the guitar itself. I'm not a cake decorating artist but I do believe this cake was not a total loss and it tasted quite good! For a first attempt I think it was not so bad! Definitely could be better but oh well!

One other thing I miss about Spokane, Jane Austen Tea Parties with my friends Johanna Darnall and Lynn Swanbom. I have very few other friends who enjoy Jane Austen as much as I do. When watching Emma on PBS I could think of nothing but them. I miss them so much!. Here is one of my favorites from one such event:

Tea being poured into my cup...

I've enjoyed sharing these things with you and I hope that you have enjoyed reading! Thanks for being there! I hope to hear from you all. Let me know how you are doing and what is making you smile this week! Have a brilliant Wednesday!

Cheers!

PS: I finally found a title! ;-)

Tuesday, March 2, 2010

Tuesday Tutorial: Reusing Plastic Gum Containers

Just a short tutorial for today, been quite busy lately and had very little time to do much for today's post! About a year ago I bought some gum that came in a plastic container and when all the gum was gone I decided to keep the container to use it for something else. I'd been using it to tote around my rechargeable batteries (2 at a time) but it was looking a bit bland all white, so today I decided to decorate it.

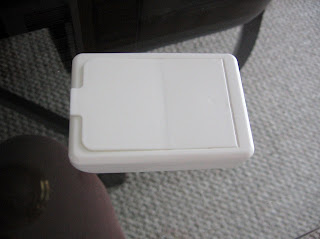
For this project you will need an empty gum container:

I used an old ice breakers cubes gum container.

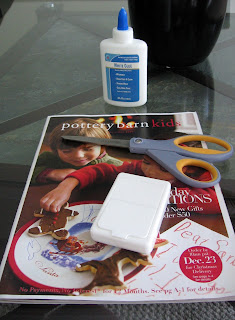
Also, some embellishments, glue, scissors and whatever else you might need:


I used embellishments in the form of cut-outs
from my PB Kids catalog

First, cut-out and collect the embellishments you wish to use. They can be anything from stickers to magazine cut-outs. Second, paste the cut-outs on the container using a decoupage glue or make your own with glue and water, apply with a paintbrush.


A few of my embellishments

I love the woodland theme that is so popular
at present!

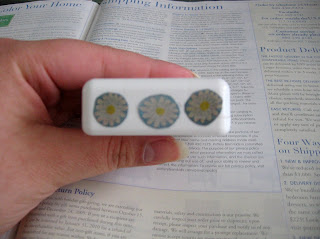
Little flowers on the back...

Don't forget to brush over top after you've added all the embellishments you want to add. It should look gorgeous and a bit shiny! You can store any small things in it. I use this one for batteries but you can use it to store needles for sewing, loose change, even gum if you do not want to deal with all that paper stuff!


Cheers!

Tuesday, February 23, 2010

Tuesday Tutorials: Inspiration Collage

Creating an Inspiration Collage in Your Journal


I use my journal for many purposes-- writing down thoughts, frustrations, inspirational quotes and more. Every now and then I like to include a sort of "inspiration board" entry made up of just images and quotes which is exactly what I want to share with you today!  The photo above is my finished product, my mini inspiration board right inside my personal journal (it is not every day that you get a glimpse into that fantastic piece of writing and passion), everything there has some meaning and inspires me in some way. Here's how to put it together.

First, gather your supplies together. Here's what I used:

My supply box...

Tags from products I've saved for tracing...

Box one of my sticker collection...

Some of the embellishments I have saved from trips and such...

Second, start placing your pieces on your "canvas," in this case the page(s) you will use for your collage.

My "canvas"

Pasting the background papers down.

Third, continue placing the embellishments you want to use in the desired fashion. I like the feel of the notebook paper barely showing as you can see below:

Almost finished, a bit of a block layout...

Complete, minus detail above heart...

Lastly, just have fun piecing and completing the collage! You'll feel so satisfied once you're finished and you'll have something uniquely beautiful.

I hope you've enjoyed this tutorial and my little collage! I'd love to see what others come up with!

Cheers!

PS: Check my flickr page for notes on the photos!

LinkWithin

Related Posts with Thumbnails